Communicate and share data with other applications.
Here’s a more detailed and technical version of the API Access Settings documentation, with added examples:
API Access Settings
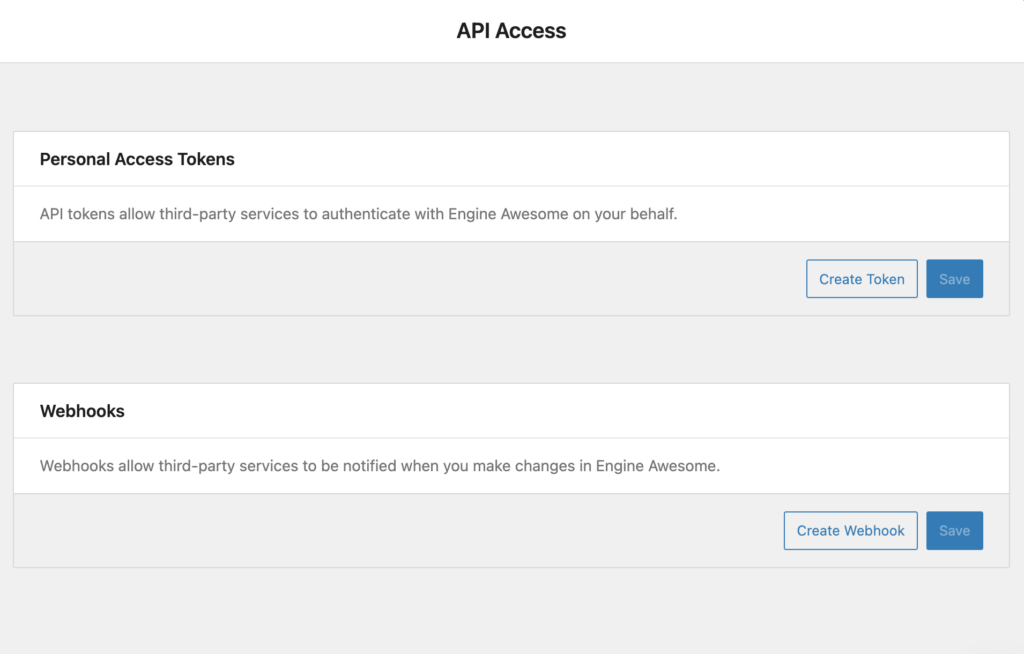
Engine Awesome’s API Access Settings provide tools to integrate your applications with third-party services. This is done through Personal Access Tokens for authentication and Webhooks for automating responses to events within your Engine Awesome account. These tools allow seamless communication between Engine Awesome and external systems.

Personal Access Tokens
Personal Access Tokens act as authentication keys that allow external services or users to interact with Engine Awesome on your behalf. Tokens can be assigned specific permissions, limiting the scope of what actions the third-party service can perform.

How to Create a Personal Access Token
- Create a Token
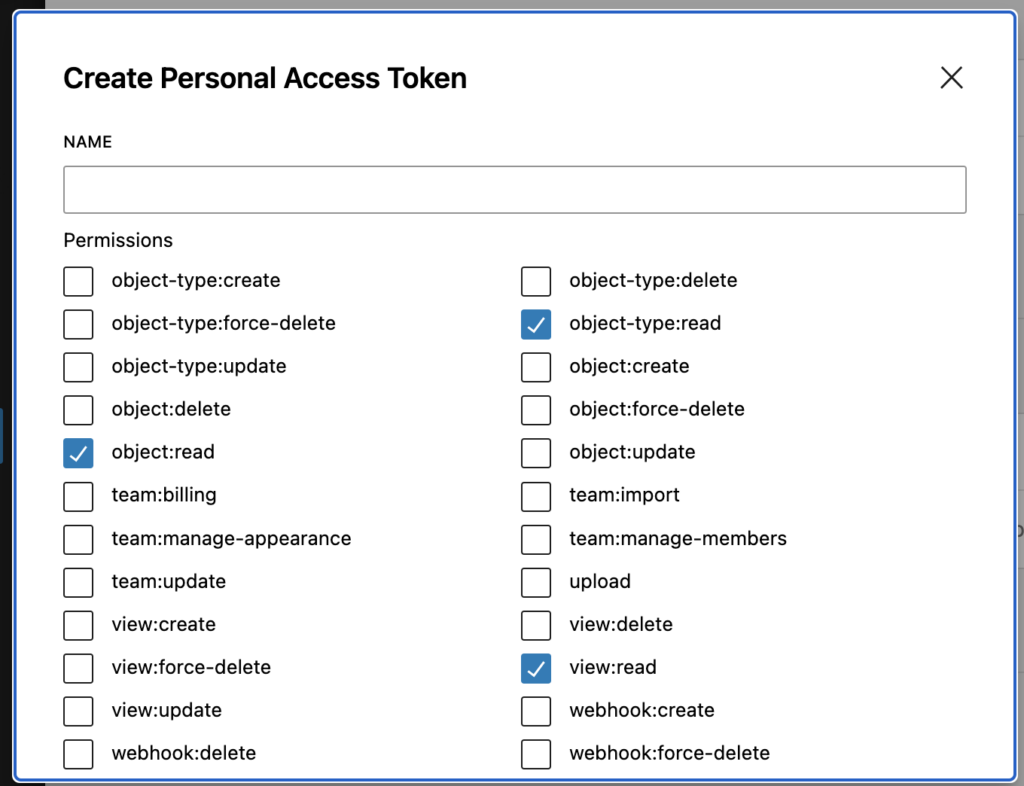
Navigate to the Personal Access Tokens section and click the Create Token button. A dialog will appear prompting you to configure the token. - Token Configuration
- Name: Enter a unique name for the token. This helps identify the token when managing multiple tokens.
- Permissions: Check the boxes to select which permissions the token will have. Permissions determine what actions the token is allowed to perform. Some common permissions include:
- object-type:create – Allows the service to create new object types in Engine Awesome.
- object-type:update – Grants access to update existing object types.
- object:read – Allows the service to read data from objects within Engine Awesome.
- team:manage-members – Enables adding or removing team members.
- view:read – Grants read-only access to views in the application.
Example Use Case
Suppose you have an external CRM tool that needs access to your Engine Awesome application to sync customer data. You could create a token with object:read and object:create permissions, allowing the CRM to both read and add customer records. By limiting permissions, you ensure that the external service can’t perform actions like deleting records or accessing sensitive data.
Token Security
Personal Access Tokens function as credentials for accessing your Engine Awesome data. After creating a token, copy and store it securely. Treat it like a password—if the token is compromised, unauthorized parties could access or manipulate your data. If a token is no longer needed, revoke it immediately to prevent further access.
Managing Tokens
Tokens are reusable and can be assigned different sets of permissions depending on the needs of the third-party service. If the integration requires updates to permissions, you can delete the existing token and create a new one with modified access rights. Tokens can also be deactivated if no longer needed.
Webhooks
Webhooks allow you to automate tasks by sending real-time data from Engine Awesome to external systems when certain events occur, such as when an object is created, updated, or deleted. This is a powerful tool for integrating Engine Awesome with other platforms by automatically triggering workflows.

How to Create a Webhook
- Create a Webhook
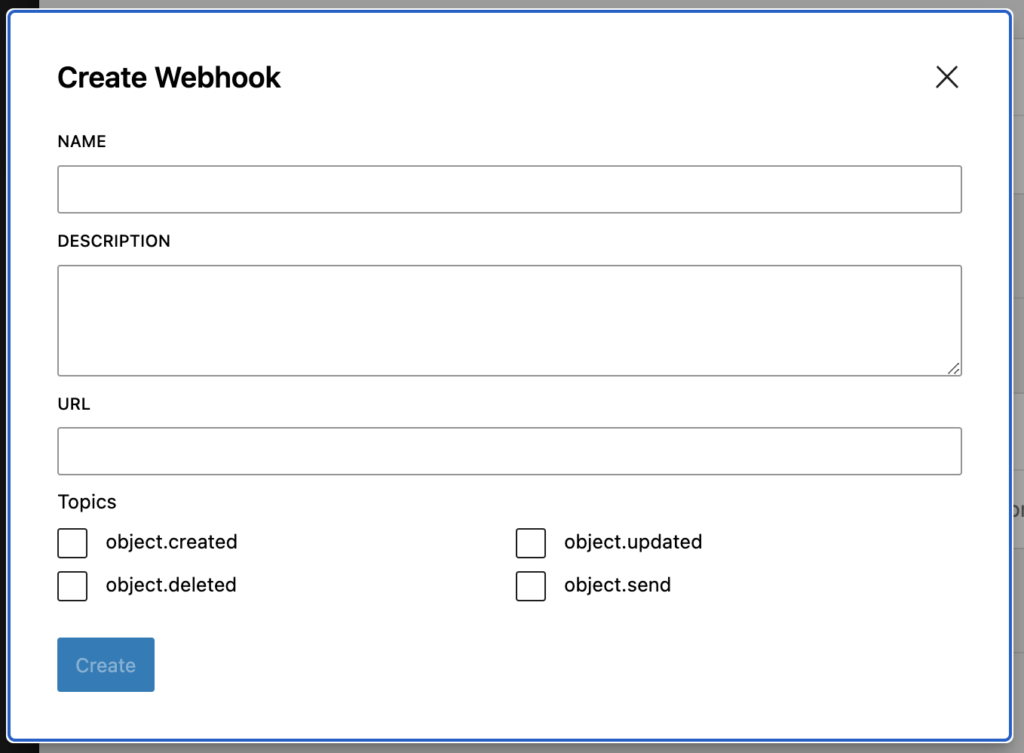
Navigate to the Webhooks section and click the Create Webhook button. A dialog box will appear, prompting you to define your webhook settings. - Webhook Configuration
- Name: Provide a descriptive name for the webhook to identify its purpose.
- Description: Optionally, include a brief description of what the webhook does or which external system it interacts with.
- URL: Specify the URL where the webhook will send the event data (e.g., an endpoint in your external application).
- Topics: Choose the event(s) that will trigger the webhook. The available topics are:
- object.created – Fires when a new object is created in Engine Awesome (e.g., when a new customer is added).
- object.updated – Fires when an existing object is modified.
- object.deleted – Fires when an object is removed from Engine Awesome.
- object.send – Fires when an object is sent (used in cases like sending out a task or form).
Example Use Case
If you use an external project management tool, you might create a webhook that sends updates to that tool every time a new Task object is created in Engine Awesome. By selecting object.created as the trigger and providing the project management tool’s API endpoint as the URL, the webhook will automatically send task data to the tool, keeping both systems in sync.
Webhook Payload
When the event occurs, the webhook will send a POST request to the specified URL. The payload will contain detailed information about the event, such as the object type, the data that was added, updated, or deleted, and timestamps. Ensure that your external system is set up to receive and process this information appropriately.
Managing Webhooks
After creating a webhook, it will listen for the selected events in Engine Awesome and send payloads to the specified URL as soon as those events happen. You can manage your webhooks by:
- Editing: Change the name, URL, or event triggers for the webhook.
- Deactivating: Temporarily disable the webhook without deleting it.
- Deleting: Remove the webhook if it’s no longer needed.
More Examples
Personal Access Token Example
Let’s say you want to automate the process of importing sales data from an external sales platform into your Engine Awesome application. You can create a Personal Access Token with object:create and object:update permissions. The external platform can then use the token to:
- Add new sales records to Engine Awesome.
- Update existing sales records when changes occur in the external platform.
Webhook Example
You’re using a third-party invoicing service and want to automatically create an invoice every time a new Order object is created in Engine Awesome. You can set up a webhook with the object.created topic, pointing it to the invoicing service’s API endpoint. Each time an order is created, the webhook sends the order details to the invoicing system, triggering the automatic creation of a new invoice.
User-Based Access for Personal Tokens
Personal Access Tokens in Engine Awesome are tied to individual users, meaning each token is associated with a specific user’s account. Once generated, a token can be used across all teams that the user is a part of. This allows the user to authenticate and interact with Engine Awesome’s API within any of their teams, without needing to create separate tokens for each team. It streamlines the process of integrating third-party services while maintaining user-level control over permissions and access.
Best Practices for API Access
- Limit Permissions: Only grant the necessary permissions when creating a Personal Access Token. Avoid giving excessive access to prevent unauthorized actions.
- Monitor Webhooks: Ensure your external systems can handle the webhook payloads and respond efficiently. Webhook failures (e.g., due to incorrect URLs or service downtime) can lead to data discrepancies.
- Rotate Tokens Regularly: For security, rotate your Personal Access Tokens periodically and revoke unused tokens.
By using Personal Access Tokens and Webhooks in Engine Awesome, you can integrate your applications with external services, automate workflows, and streamline business processes.